Tuesday 15 September 2015

Power Of POWER BI


Getting Started....
Microsoft Power BI is reach of features, rich graphics and supports numerous data sources.
To use MS Power BI features you have to signup here. https://powerbi.microsoft.com/

  1. User your organization Email Id for signing up. Microsoft will use your Organization Office 365 Licensing for this.
  2. It verifies your organization email id and Password.
  3. You will get free access but will be limited to few sources and samples only.
  4. To have full access you need to purchase Power BI Pro features.MS provide a 60 days trial pack for pro features :-)
  5. Once sign up it will take few seconds to setup a Power BI work environment for you.   
  6. Following which it will allow you to connect to you with multiple data source options within or outside your organizations


  1. Here I am creating a sample data source using Xlsx (Local File Source) as Source
  2. you will get following like environment


  1. It same as Excel Pivot with little bit different layout but more charts like MAPs.
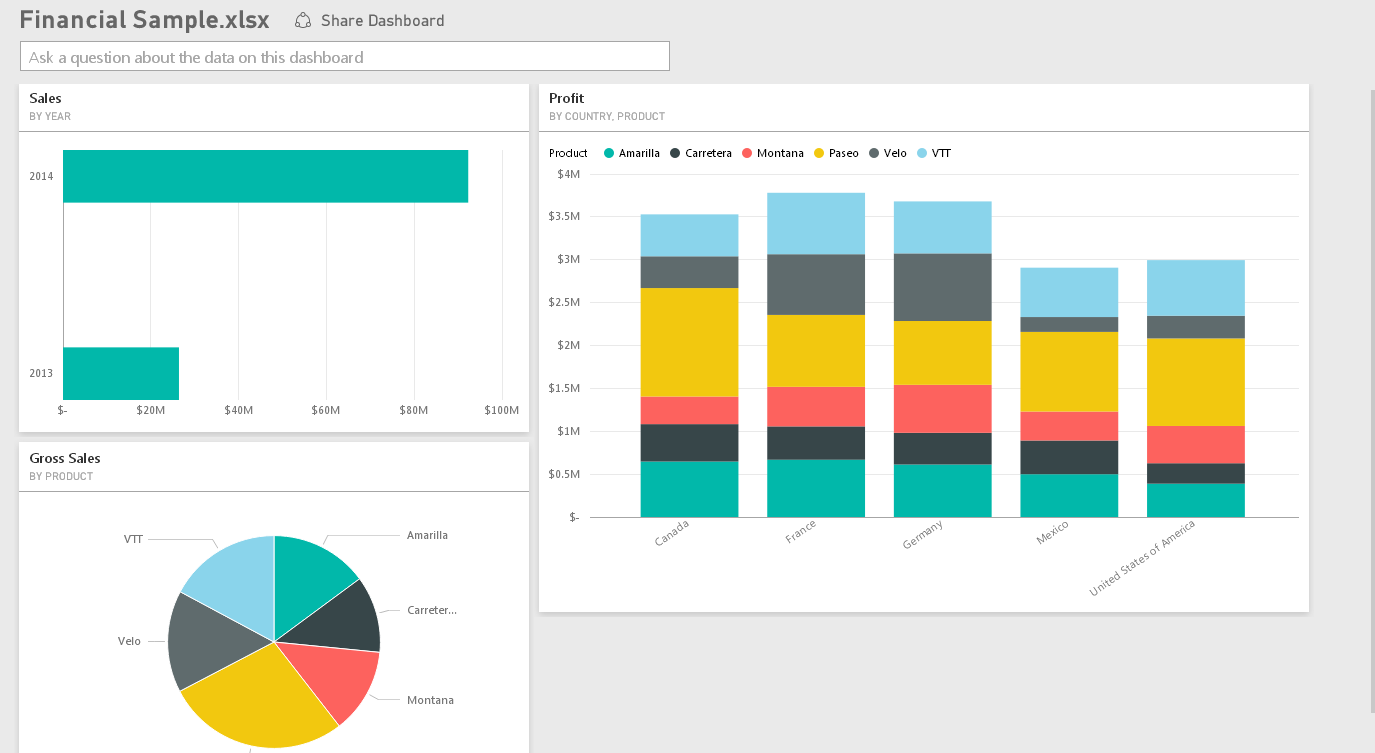
  2. Following is a sample report-


  1. Overall dashboards will look like


Well I have just started here. Please look for more on this in coming days…………………..


Tuesday 8 September 2015

Migration Options For SSRS

Migrating of reports from one SSRS version to another is now a very common requirement. 

There are few tools available in market which can make help in migration process 

Here is in this article i tried to list down their pros and cons -  

  1. Using SSRS ReportSysnc Tool
By using this tool I was able to deploy reports to SSRS 2012 from SSRS 2005.


                       Advantage
                   Dis-Advantage
1. Very quick in migrating report
1. Does not deploy data source
2. Deploy subscriptions as well
2. Need to create Data source manually and re link reports to data source.
3. having source and destination side by side help in understanding synchronization
3. This makes it  time consuming approach.


2. Using  RSScripter - ExecSQL.org Tool
This tool really worked well and will definitely ease migration task.


                       Advantage
                   Dis-Advantage
1. Deploy reports and data source both
1. After migration shared data sources need to be re visited for inserting passwords, only if user id and password are hardcoded.
2. It has migrated report model as well. 
2. Subscription are not able to migrate. 
3. It script out all the ssrs code which needs to be than taken to migrated (new) server and need to deploy their using command prompt utility of SSRS.
3. Manual work of deploying SSRS script to migrated server is required with some minimum changes to script based on server details.
4. Working very smoothly and I have not faced any problem in deployment while migrating  couple of existing projects. 


3. Manual Migration process  -
This is an obvious approach, that we manually migrate all the reports.

                       Advantage
                   Dis-Advantage
1. Safest approach as one by one report will be taken and deployed and tested.
1. Very long, time consuming and tedious approach.
2. can fix issues and do enhancement if required while migrating.


Thursday 30 July 2015

SSIS : Lookup Vs Merge Join


In many interviews you will be seeing interview asking what is difference between merge join and lookup component.
Most of the people think Merge and lookup are same, well if that was the case than Microsoft would have not created two separate component.

Lookup and Merge join are two different activities they perform in different way and are meant of different purposes.  

Area
Merge Join
Lookup
Work function
Joins two data set based on one or more key columns. This joining is just like T SQL join (actually a hash join)
It reference data for a one and only one possible match of the lookup table (or query)
Input
  • Input needs to be sorted
  • Need 2 input source
  • Input need not to be sorted
  • Need one input
Output
Only one output with merging (joining) of two input data sets
Two outputs Matched and non matched
On Match
Matched rows will flow into output pipeline. All matching rows of both the source will be flown

Match rows will into Matched output pipeline.
Here if multiple matching rows are there in lookup table than only first matched row from lookup table will be selected.
On Non Match
It gets define by merge join settings-
  • Inner  - In case of inner join, non matched rows will be discarded
  • Left – In cases on left join, non matched rows of left of sources (first input) will be considered and other source non matched rows will be discarded.
  • Right - In cases on right join, non matched rows of right of sources (second input) will be considered and other source non matched rows will be discarded.
  • Full – both source non matched rows will be considered in output
Non match setting is available, when enabled-

  • Only non match rows of source will be considered and will be flown in output.
  • Lookup tables’s non matched out put is will not be considered at all.


Null Values
You have setting to specify if NULL to treated as equal. This will treat NULL value equal to other NULL value.  Else it will discard the row as non matched one.
Null values in source will match to null values in lookup if both tables has null, else of only source has null it will return an error. Null in lookup table will not have any impact.
Usage
When two data set needs to be joined (left, right, full)
When data needs to referenced like get PK from master tables based on name.  
Specific requisite
Input needed to be sorted
NA

I hope above comparison will help you understand the difference between SSIS Lookup and Merge join.

Monday 20 July 2015

Normalization/ De Normalization in data warehousing


Now lot of places you will find of normalization definitions some of them are very technical and some seems to go beyond radar make you more confuse –
Here I have given it a try for making it simple –

Normalization 
For me normalization is simple, reduce redundancy, save some storage space and maintain consistency.
Removing redundancy helps OLTP system, as they have lot of UPDATES. Less rows to updates gives offcourse more performance.

De Normalization 
Though we don’t have any proper definition of term “De normalization” yet it’s been used frequently.
Let say de normalization will involve creating more attributes (columns) in one table. This will reduce the number join and can give better performance.

Star/Snow Flake and Normalized/De Normalized – What is what??

For me Star is less normalized so I’ll call it De Normalized.
If in real time system you have to maintain a Star Schema you will have to manage big/ huge dimensions.

Snow Flake is a Normalized;
You decompose relation ships here and create smaller structures. Example – Adventure work DW Product dimension.


So Big Question? - What to do when design for DWH –

Well I prefer to go with……….wait for it……………Reporting. Yes you heard it.
It’s not about normalization or de normalization. It’s about reporting and its performance.
Your End users don’t care whether you normalized or de normalized data, they just want to see their reports well with right numbers and fastest way possible.  In today’s time very handful of organization/customer/user will care for storage/space, all they want now is quickest reporting or analytics.


There are no fix rules of going Normalized will be better or vice a versa. Hence it is always based on your reporting and analytic requirement.  

Wednesday 15 July 2015

Uing Custom assembly in SSAS


Sometimes default function and features of SSAS are not sufficient to fulfil the requirement. Therefore, Analysis Services lets you add assemblies to an Analysis Services instance or database. Assemblies let you create external, user-defined functions using any common language runtime (CLR) language, such as Microsoft Visual Basic .NET or Microsoft Visual C#. You can also use Component Object Model (COM) Automation languages such as Microsoft Visual Basic or Microsoft Visual C++.


Following is an example where we have used an assembly to create a custom drillthrough.

Requirement
Requirement is to have huge text column (BLOB) to be displayed when doing a drillthrough in SSAS using excel as tool.

Problem statement
  1. By default column which included into drillthrough needs to be present in cube. If we don’t have columns in cube we can not see then in drill through.
  2. Having huge text column into the cube will increase the cube storage as well will degrade the performance of cube. Also it will increase cube processing time.
 If we keep the required drillthrough columns in cube, our cube performance will be impacted, if don’t keep it we wont be able to drilldown on it usnign default drillthrough functionality.

Solution
Using an assembly
We come up with a solution where we will not keep the required BLOB columns into the cube, but will use an assembly to query background SQL DB and send a result back into excel.
  
  • A dot net based assembly having function to which will call database stored procedure or T SQL. This function will take MDX syntax based parameter as input.  

  • To make a call to this assembly use action tab of cube designer and use following kind of syntax –

Call MyAssembly.MyClass.MyFunction(a, b, c)

  • This function can internally (within assembly) call multiple functions.
  • Function will have a connection string to SQL DB. 
  • In Action tab select the return type as dataset. This will allow you to display return result in a new excel sheet.
  • This assembly and its function can be used in multiple ways, instead of returning a result set it can also return a web page URL or SSRS report URL. 
I have used assembly created by "https://asstoredprocedures.codeplex.com/" and used it as basic template. i modified it for my purpose and use.


Deploy
This assembly can be deployed using SQL Server Management Studio.

SSMS -> Expand Assemblies folder -> Right click -> Click on New Assembly -> it opens Register Server Assembly window -> choose type and through File Name add your assembly

Security
Whenever we use custom assembly we also faces security challenges.
By default SSAS provide a security options as follows -

                  
Permission Setting
Description
Safe
Provides internal computation permission. This permission bucket does not assign permissions to access any of the protected resources in the .NET Framework. This is the default permission bucket for an assembly if none is specified with the PermissionSet property.
ExternalAccess
Provides the same access as the Safe setting, with the additional ability to access external system resources. This permission bucket does not offer security guarantees (although it is possible to secure this scenario), but it does give reliability guarantees.
Unsafe
Provides no restrictions. No security or reliability guarantees can be made for managed code running under this permission set. Any permission, even a custom permission included by the administrator, is granted to code running at this level of trust.

Conclusion 
Using custom assembly is very easy. It lets you customized your cube/MDX in multiple ways. 

References  

Wednesday 13 May 2015

Connecting to TERADATA using SSIS


Connecting to Teradata using SSIS can be tough a task if you miss installing important prerequisite.

It is best to have some Teradata Expert with you to help you understand required prerequisite installations. I was luck to have friend who provided me all the perquisite installation file in a shot.

Following is a step by step guide
  1. Instllation of Teradata prerequisite

Following is list of Drive I have install ( in a sequence)

      1. Microsoft Dot net 3.5
      2. Shared ICU Libraries For Teradata 14.00.0.1
      3. Teradata GSS Client V 14.0.2.2
      4. Teradata Data connector V 14.00.0.10
      5. .NET Data Provider for Teradata V 14.00.0.1 (For .NET Driver of SSIS)
      6. ODBC Driver for Teradata V14.00.0.4  (For having ODBC connection)
      7. Teradata SQL Assistant V 14.01.0.2 ( A SQL browser like Todd, help you check connectivity with TERADATA)
      8. Teradata Administrator v14.00.0.2
      9. Teradata CLIv2 v14.00.0.4
      10. Teradata BTEQ v14.00.0.5
      11. Teradata ARC v14.00.0.4
      12. Teradata MultiLoad v14.00.0.8
      13. Teradata FastLoad v14.00.0.7
      14. Teradata FastExport v14.00.0.5
      15. Teradata TPump v14.00.0.6
      16. Java Runtime Environment
      17. Teradata Parallel Transporter Base v14.00.0.8
      18. Teradata Parallel Transporter Stream v14.00.0.8


Above all are very simple setup file and required no input from installer, just double click and couple of next button will get you through.
Once you installed all these drive I recommend having a restart of your machine/server if possible. 


  1. Creating a Data Source connection

·        Create a Shared Data source like following


·        You will get option to select a Tera Data Driver.
·        Select the “.Net Data Provide for TeraData”
·        Fill the details of Server, credentials and database name


·        After filling details do a test connection.

  1. Using connection in Source

·        Drag and drop “ADO .NET Source”


·        Double click on this to configure source component like below


·        Simply select data source you have created in above steps and after that you will get option to browse the table list, select the table you want to pull data from.


That’s it. Connect this source further in transformation or destination as per your requirement. 
You will be able to source data from TERADATA.

Apart from this there is another way of connecting is by using Attunity, which you can get it from following –

if you have followed all the above steps, you should not be facing any problem using this driver.